Emblem of the Order - Part 1

The Order of the Fitch

One of the few “duties” of a loyal member of the Order of the Fitch is to design and build a personal Emblem of the Order. Every member’s emblem is unique, with the exception of two features. First, each emblem should have a pseudo-chivalric air. Second, each design must incorporate a fitch and a mahlstick.

This “introductory series” will follow the design and construction of my personal Order Emblem and will focus, as much as possible, on the fundamentals of the process.

Order+of+the+Fitch+Feb+24.jpg

Designing an Emblem

I roughed out my emblem design in Procreate, opting for a simple wooden shield, encircled by a belt and backed with a crossed fitch & mahlstick. A crowned boar’s head will be emblazoned on the shield (a nod to the traditional hog bristle fitch).

My emblem’s design will be relatively straightforward to build in EnRoute — the belt will be the most challenging element (because it wraps around the shield). We will take the time to explore at least one or two ways to build each element. By the time we are finished, you should have a basic grasp of a handful of the program’s capabilities.

Opening a New File

New File Mar 1

With our design in hand, we can start a new file in EnRoute. We will keep the finished emblem relatively small (no more that 2’ across and 2” thick). I have defined my “plate” (the area to be routed) as 24” x 24” x 2” and set the “surface” to the top of the plate. These parameters can all be changed later.

I am working with imperial units (although Canada uses the metric system, imperial units continue to be used in the construction industry), but you can also choose metric units when you install EnRoute.

Importing a Bitmap

Import Mar 1.png

Next, we will import the design sketch. EnRoute will import .bmp, .jpg and .pdf images. You will notice that I imported a light green version of the sketch — this will be helpful later.

With the design selected, press F2 to open the “Precision Input Centre.” Ensure “Proportional” is checked before entering an appropriate width or height to resize the sketch.

resize mar 1

Creating Contours

Now we are ready to start creating the vector “contours” we will use to build our 3D “reliefs.”

There are a number of ways to create contours. For instance, if our sketch was tighter/cleaner/darker, we could trace it with Enroute’s “vectorize bitmap” function. Alternately, we could have created the vector contours in Illustrator and imported them directly (eliminating the need to import the sketch). Instead, to create our basic contours, we will simply trace the line work by hand.

In our next instalment, we will look at a few ways to draw vector contours in EnRoute.
MultiCam Boardroom - Part 4

As you may have guessed by now, we are huge fans of texture. And we love to use our CNC router to build texture into our work. When our friend Jeff Hartman, one of the authors of EnRoute software, first showed us the rapid texture function he was developing my father immediately thought about using it for creating unique wainscoting. Rapid texture was released just in time for this project and we designed the wainscotting with this technique in mind. The beauty of rapid texture is the speed at which you can add texture to large surfaces. It used to take hours to route panels like these, but with rapid texture it can be done in a fraction of the time.

plain+wainscot.jpg
rapid+texture+entry.jpg

We used four different rapid textures in four areas of the building.

In the entry/reception area (above), we used a 3/4" ball nose bit to create vertical lines in the MDF wainscot panels. We added just a teeny bit of wiggle to “happy” them up just a little.

The hallway’s (below left) were treated as a transition area — we wanted to hint at what was coming in the board room. We used MDF and the 3/4" ball nose bit once again but made the lines a little wavy this time. The pattern resembles ocean waves as seen from an airplane. The trim was accented with a routed linear gear motif — reinforcing the building’s “CNC theme”.

The “fossil office’s” panelling (below right) looked like it was hewn from flint. The lines were routed in MDF with the same 3/4” ball nose and tweaked to wiggle every so slightly both vertically and horizontally. You will notice we incorporated the “M” medallion into the trim.

rapid+texture+hall.jpg
sean+rapid+texture.jpg

For the nautical boardroom we wanted to evoke the feeling of ocean waves. The texture was created with a 1.5" V-bit and the patterns resemble a stormy sea. We ran a test using MDF but were dismayed to see chunks of material breaking out. For our second test we used a sheet of 3/4" 30 lbs. Precision Board HDU — happily, it worked nicely. As an added bonus, priming the HDU (with Coastal Enterprises high build primer) required fewer coats than the MDF.

wainscot wave.jpg

We painted a sample board to show the client, opting to use cool silvers on the wainscotting to play against the warm rust tones of the “iron” ribs.

wainscot boardroom.jpg

While we wanted to play cool colours against warm we also needed to stay within the theme, which meant “dirtying up” the wainscotting to match the rest of the room.

We painted the wainscotting a blue base colour first. (We used the same colour on the top portion of the wall.) Next we used a blue jean coloured glaze and a custom glaze (a mix of dark brown, cherry red metallic, dark blue and a little black).

The base board and trim are MDF while the “M” medallion and rivets are routed from 30 lbs. Precision Board HDU. We painted them with a rusting metallic paint. The resulting colour palette works together nicely.

MultiCam Boardroom - Part 3

My father and I have a handful of conversations that we seem to return to again and again — one of them is the “what kind of shop are we?” conversation. After all, we design buildings and logos, we build theme parks and furniture, we make sculptures and signs…

We don’t really fit in a single category, Nevertheless (since we do make signs), one of the ways we think of ourselves is as a sign shop. But we think of “signs” differently than many sign makers. For us, a “sign” is far more than just a flat board with letters stuck on it. Our definition of a sign includes anything that brings attention to our customer's business, product or service. A “sign” can be; a building’s design, a monumental sculpture or anything else we can think of!

The MultiCam offices and boardroom are a great example of this philosophy in action. We worked with the general contractor to include a three dimensional “M” medallion (for MultiCam) throughout the office — in the wainscotting, and as corner-blocks in the trim around doors and windows. Each “M” medallion was tweaked to suite the room it went into. The end result was a subtle branding campaign and a wonderful detail throughout the office and showroom areas.

Screen shot 2010-07-06 at 8.43.29 AM.png

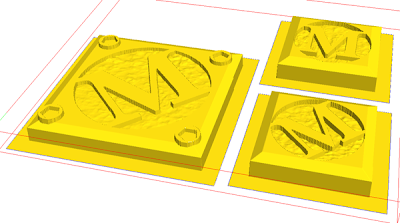
For the submarine boardroom, we used a round version of the “M” medallion — complete with rivets. Below you can see a screen shot of the file we created in EnRoute. These were placed in the wainscot trim and a larger version was the centrepiece of each arched rib.

Multicam Detail 01.png

The weathering on these “M” medallions was created using a texture bitmap from our Texture Magic: Classic Collection, called splotches. Once routed, it looks amazingly like weathered metal. The rust paint finish will complete the story. The medallions were tool pathed with a 3/8" ball nose rough pass and a 1/8" tapered bit at a 75% overlap for the final pass. We routed them from inch and a half thick, 30 lbs. Precision Board HDU.

beam+medalions.jpg
test+fit.jpg