MultiCam Boardroom - Part 2

With the sides of the ribs cut, assembled and primed we moved on to the arche’s centres. Each rib is made from 14 pieces and (one of the joys of CNC routing) they all fit together perfectly!

top ribs.jpg

Once glued is dry we used an air powered die grinder to remove glue seams and any other imperfections. Where everyone else would break out their sander and spend hours trying to get everything perfectly smooth we have always preferred going in the opposite direction — adding texture! There is something warm, friendly, and compelling about a project that looks a little “used.” And as an added bonus, any imperfections the project (inevitably) acquires over the years won’t destroy the integrity of the design!

texturing+edges.jpg
peter.jpg

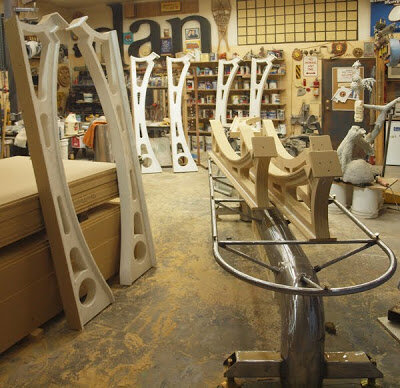
In the next shot you can see the die grinder’s results — we still have to fill the screw holes and add a bead of caulking on the inside corners to round them out.

roughed up.jpg

Next, we used Coastal Enterprises high build, water based primer (marshmallow paint) to add one last layer of texture. We used a one inch brush and random strokes, leaving ridges of primer everywhere. All this texture will start to make sense once we add the rust paint.

primed.jpg

MultiCam Boardroom - Part 1

Once upon a time, we were given the opportunity to theme MultiCam Western Canada’s boardroom. The boardroom was the central showpiece for their offices, tech centre and showroom. The room was designed as a marketing tool — showcasing the power and versatility of MultiCam’s CNC machines in an engaging way. In this series of posts, we will take you through the construction of this one of a kind project.

board room marker.jpg

This video will give you a taste of the finished product and also talks a little bit about the philosophy behind our design.

As you can see, the boardroom has a nautical theme and standing in the room feels a little bit like standing inside a steampunk submarine.

board room rendering 2.jpg

When we bought our first MultiCam CNC router, we were determined not to use it as a jigsaw! In fact, we use our machine almost exclusively for dimensional work. We made an exception for this particular project when we designed the “iron” ribs that line the boardrooms walls. We used 3/4” flat stock MDF and cut out shapes which will be glued up and assembled later.

EnRoute screen shot.png

As always, we built the cutting files in EnRoute. Every measurement was critical in order to fit perfectly into a room that was already built. We threw sheet after sheet onto the router and let the machine do its work. We had hoped we could assemble the pieces as they came off the machine but, in the end, we had our work cut out for us just keeping the machine fed!

rib pieces.jpg

Each rib (actually each quarter rib) was made up from eight separate pieces. They fit together perfectly and a little hand work with a die grinder added texture to the edges and rounded the outside corners. We used some paintable acrylic caulking to round the inside corners. Next we added a generous coat of Coastal Enterprises FSC-88-WB primer. “WB” stands for water based. This primer has the consistency of heavy cream and, when it is brushed on, it leaves random brush strokes that create a nice texture. (FSC-88-WB goes by the nickname “marshmallow paint” in our shop.) After we apply our rusting paint these ribs will look like they have been cast in iron.

priming+ribs.jpg
ribs.jpg

As with all of our large projects, the nautical boardroom had taken over the shop. We decided to mock the boardroom up and see how everything fit together. The tops of the heavy, “cast iron,” arches are still imaginary — but even with the missing pieces you can begin to see how the boardroom will look.

board room mock.jpg

You can learn more about other parts of this project by following these links:

MultiCam Submarine

MultiCam Boardroom Table

Jungle Ceiling Fan

Dinosaur Desk

Cliff's Meats - Part 2

The sign’s back board is now routed and it is time to glue everything together.

sign face on router.jpg

We have also made good progress on the first bull's head. Note the heavy steel rod that goes through the head and into the horns to make sure they are strong and secure.

head in progress.jpg

Next, we will attached the bull's head to the back of the sign. We will weld up a steel frame (to be laminated inside the sign) and then finish the sculpting in place. It is always best to sculpt “as it will appear finished” if possible to get the proportions right — even for cartoon characters.

You can see a small groove in the horizontal piece of the sign — this was a routing mistake. We accidentally called up the wrong file (it had a similar name) but no real harm was done and the top piece will laminate over it before we are done.

head on sign.jpg

The internal frame is a 1.5" x 1.5" square tubing frame with some sturdy eye bolts on the top.

glued up sign.jpg

We will glue and screw scrap blocks of 1.5" Precision Board around it the frame.

inside of sign.jpg

Then we will attach the back side of the sign (with the second bull head). We will sculpt this bull once in place.

rough sign.jpg

Because this is a dimensional sign — it measures nearly four feet thick! — we will take a little extra time and effort to finish the edges. We will create the woodgrain texture on the edges, by hand, with an air powered die grinder.

sign edges.jpg

These little details add value to a project and is one more way we can separate our work from the pack.

The last thing we will sculpt is the bull’s nose ring. The ring wasn’t part of our original design but there is always room for improvement!

sculpt done angle.jpg

The sign is now ready for paint…