Cliff's Meats - Part 1

This double sided sign for Cliff’s Meats — a meat cutting business — features two sculpted bull's heads. We will create the backboard using high density urethane (HDU) and the bull’s heads will be sculpted in epoxy.

cliff's meats sign 2.jpg

After the initial design is done, the next step is to figure out just how the bull will look from the side.

bull head sketch.jpg

With the design sorted we will use Illustrator to create the vectors we need. These are then imported into EnRoute. Note that the front view of the bulls’ head is only for reference — we won’t be creating a relief from this angle. The bull's profile will be used to cut eight 1" pieces of Precision Board HDU which we will screw together to make two heads.

cliff'smeat vectors.jpg

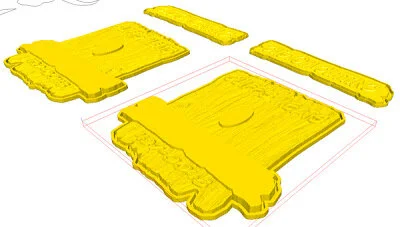
The main body of the sign will be routed from 2" 30 lbs. Precision Board HDU. Since the sign measures 4' x 4' it can stand to be relatively deep. The horizontal boards will be cut from 1.5" Precision Board HDU and laminated on top. We will use our cartoon woodgrain bitmap texture for the woodgrain specifying a depth of .3". We will simply flip the resulting boards for the second side of the sign.

ready to route.jpg

Because we flipped the boards for the second side we need to build the text reliefs as a separate item from the sign face. Once the text is made we will create a copy and then merge one copy to each side of the sign. This ensures that the front and back of the sign will fit together perfectly.

riles ready to route.jpg

Since the heads will be covered with sculpting epoxy we will be able to use scraps to create the bulky nose and top of the head. Then we will use tinfoil to bulk out the nose a little more. If you look at the photo closely you can see Sarah in the background mixing the sculpting epoxy — having a second person mixing epoxy speeds up the sculpting process.

bull head sculpt 1.jpg

We won’t worry about details at this stage — we just want to rough out the bull’s head.

bull head sculpt 2.jpg

Out Of The Box Solutions - Part 2

While the HDU box sides were being routed we whipped up a plywood box that would serve as the base structure for the sign. The top and bottom 'metal' bands was 30 lbs. Precision Board HUD. The plywood was cut at a 45 degree angle and also tapered — just to make it a little trickier. The hole in the top (and a matching hole in the bottom) accommodates the transformer for the LED lighting.

box ready.jpg

For the smoke trail and flying saucer support we opted for welded steel. We bent up a piece of 1" x 1" square tubing and welded it to a steel plate which then we bolted to the plywood. Then we welded some pencil rod to support the expanded metal lath which, in turn, will support the sculpting epoxy.

welding structure.jpg

The 'T' shaped steel rods at the top of the next picture will be laminated inside two flying saucer halves.

ready for next step.jpg

Next, we glued the routed ‘wood’ panels onto the box.

ready for workshop.jpg

Below you can see several of workshop participants learning to tie expanded metal lath onto the pencil rod smoke plume.

everyine helping-2.jpg

The flying saucer is piloted by an alien. He is sculpted with epoxy and measures about 8" tall. Here we are testing the effect LED's would have from the instruments on his flying saucer.

alien test flight.jpg

The flying saucer file was built in EnRoute and routed from HDU. Here one of our workshop participants is giving Dan a hand assembling it on the structure.

saucer assembly.jpg

The saucer details were sculpted with two part epoxy and the engine smoke was formed with balls of sculpting epoxy over crumpled tinfoil. We added orange LED's in the rear jet engine to throw a glow over the smoke.

flying saucer detail.jpg
out of the box progress.jpg

Out Of The Box Solutions - Part 1

This particular piece was a promotional display. As usual, it started its life as a concept sketch.

out of the box concept.jpg

Once the design had been settled, it was time to design the vectors. The challenge on this project was to curve the sides of the box inward while also splaying out the top edge. With EnRoute there are a number of ways this can be accomplished. For instance, we could use the “sweep two rails” function. However, we opted to use our favourite technique — applying bitmaps.

vectors for sides.jpg

Once the vectors had been created, we made a bitmap — a blend which faded from white to black to white again.

When applying bitmaps it is important to remember that white is the “active shade” — applying a pure black bitmap will not change the relief in any way. Grays are more of less “active” depending on their value — the closer to white they are the bigger the change the will make.

We applied this bitmap to the relief to raise the boards and the lettering in separate passes, keeping the numeric values the same so their curves matched.

bitmap over vectors.jpg
fade.jpg

Then we took a cartoon woodgrain bitmap from our Texture Magic: Classic Collection and applied that to the boards. The end result looked something like this.

routing file components.jpg

We positioned the letters on the boards and merged them together with a flat background. Note that we kept the boards slightly oversized so we could trim them on the table saw to get the corners cut at a forty five degree angle.

screen shot of routing file.jpg

The picture below shows just how much curve we managed to achieve using the bitmap.

top view of file.jpg