Up, up and away

Today a lot of work was done far from the ground as the crew got ready for the first trusses that arrive tomorrow, bright and early. With the weather bright and warm it was the perfect day fo it!

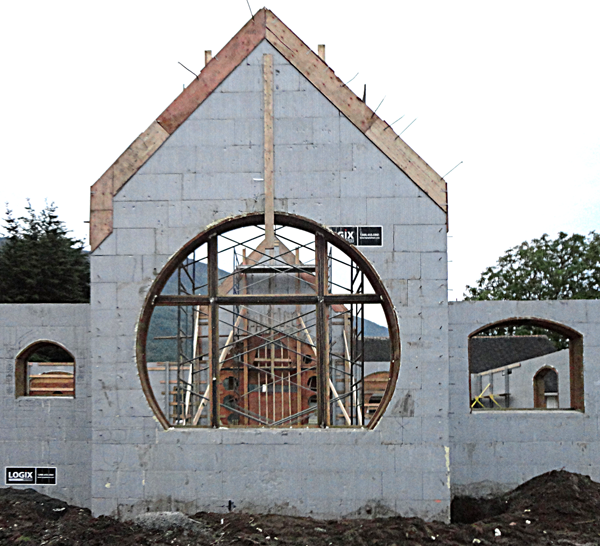
The last of the braces were removed from the walls and then it was time to put the wood plates on top of the walls. With the walls being more than twice as thick as a normal house the crew was confortable walking around the top. They said it was like walking on a sidewalk. I had an even loftier view from the top of the vaulted walls (on a scaffold.)

view from above 2.png
view from above 1.png

I was up on top of the vaulted wall to figure out how to make an onsite adjustment (fix a mistake we made) The solution was to cut a sliver of concrete off the top of the wall to make room for a steel truss we would bolt to the top. My good neighbor Gord sent over one of his crew with a concrete saw to perform the magic. Better yet he sent him in a snorkel lift to perform the task easily, quickly and safely. The wide angle lens of my camera make the sixty-five foot lift look like it was a hundred feet long!

snorkel lift adjustment.png

Tomorrow, everything changes quickly as the roof begins to go on. Stay tuned...

-grampa dan

From dream to reality.

It is one thing to draw something cool and quite another to realise it as a full 3D object, often larger than life. In between there are many steps required to create it, safe and legal. I often get asked just what is involved.

Our new house is a great example. The design is fanciful, somewhat unusual. It is pretty easy to come up with the concept. I'll show our front window area as an example.

front window.png

The actual building ended up a little taller but we have stuck with the basic design. The drawings done by the draftsman were pretty basic, the walls straight and they showed a basic vaulted truss. Notes on the drawing stated that there would also be some structural steel and it would be engineered. Most importantly the structure has to be neatly tucked inside the features we build. As I drew my first drawing I kept in mind just what it would take to build it. Experience comes in handy and the more the better!

The window frame was built from welded stel and laminated plywood. It was built around the window patterns we created. The engineer specified the steel that was put into the concrete that was poured into the ICF forms. Once the house walls were up the building looked like this a far cry from what it would look like when we were done.

front window without bucks.png

The beamwork was the next item on the adjenda. It was more decorative than functional but required engineering none the less. I did up a drawing that explained what I had in mind to the engineer. He added many notes and small details showing how heavy the steel would be and how it would all go together. I didn't really get any surprises here but the engineer's notes and stamp made it offical.

engineering notes.png

Once I had the engineered drawings in hand it was time to break out the welder and get to fabricating some heavy steel. I built two of the trusses - one for the front of the house and one for the rear porch.

steel trusses.png

While I was busy back at the shop Peter had a second welder humming out front. He was building the armature for the first of the giant trees with knarly roots that would flank each side. We do this work with 1/4" pencil rod which will be covered with galvanized steel lath and then a heavy coat of fiberglass reinforced concrete. 

peter welding front tree.png
front tree started.png

We'll sculpt that to look a whole lot like massive and ancient trees that will flank the round window. The final step will be to paint it up to look totally believeable - just like the drawing we came up with back in April.

Stay tuned to watch this dream unfold.

-grampa dan

House windows revealed at last

Today Peter and I spent the day taking off the bracing, removing the window patterns and straightening the site. Today would be the first day we would really see how the windows and doors would look in the house. I could hardly wait!

We finished the entrance (west) side of the house first. The pantry window suddenly looked huge with the pattern removed. The buck would stay in place to hold the window in place when it arrived.

entrance walls without bucks.png

With the patterns removed from the window bucks the front door suddenly became magic. We could see just how big the front door would be and how the sidelights would curve around it.

front door without bucks.png

The big front window was the one I was really waiting for. Peter worked on the outside while I worked on the inside. There was a lot of bracing and strapping to remove. By mid afternoon we had this part of the project done. The view from the inside was spectacular.

front window inside without bucks.png

The outside was just as cool. Finally we could see where the glass would go and how the timbers would intersect the window space. I liked what I saw!

front window without bucks.png

At last we could see how the big window will fit into the house as a whole. Next Tuesday the first of the roof trusses will arrive. The roof will quickly change the look of the house in a big way. In a few days we'll be figuring out how to build the eyebrows over the windows and how the fancy trim will fit on the walls.

front of house without bucks 2.png
front of house without bucks.png

Inside things opened up as we removed the braces, scaffolding and straightened things up in general. Thanks to Peter's great efforts we accomplished a great deal today. Next week will be another fabulous week of progress as we start in on the theme work while Harold's Contracting crew get begin the roof. It's going to be fun! 

-grampa dan