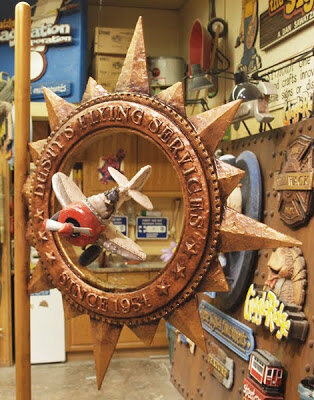
Dusty's Flying Service - Part 5

Part 4

(Gold Leaf Basics — Part A)

When we tell our customers that the gold on the signs we do is real they are often incredulous. Once we convince them it REALLY is 23K gold they assume the sign is worth a fortune — after all, we all hear on a regular basis just how valuable it is. The truth is, however, that while gilding does add value to a sign it really isn't that expensive a process.

We buy our gold in sheets. They measure 3 3/8" square and are slightly bonded to sheets of tissue paper. This is called patent gold. Gold can also be bought “loose” but loose gold it is much harder to handle. There are 25 sheets of gold in a book and twenty books (500 sheets) in a box. Gold leaf is a lot less expensive by the box — particularly when you include the cost of shipping.

(We buy ours at W&B Gold Leaf.)

gold leaf.jpg

We use oil based size to fasten the gold to the signs surface. The size comes in slow or fast setting, determined by the time it takes to '“tack up” (dry to the point you can lay the gold). We prefer fast size for surface gilding as our shop tends to be a little dusty. The size looks like a clear varnish. A thimble full was more than enough to do this particular sign. A little goes a long way! We recycle plastic pudding cups for this type of job. Once we are done they are garbage but we don't have to deal with any solvents — except to clean our brushes.

size.jpg

We brush the size on with a small brush. Because we routed the bevelled letters with a slight shoulder, raising them off the surface, they are quite quick to paint. A quality brush, however, is critical for a good job. We take our time and cover each letter well so there are no “holidays” (missed spots) later.

sizing letters.jpg

Now comes the hard part... waiting for the size to tack up. How long we wait depends on the temperature, the humidity and if there is air movement. When its ready a knuckle dragged over the size will squeak — Do this on a test piece - not your finished work!

Part 6 (B)

Dusty's Flying Service - Part 4

Part 3

We decided to paint the compass star look like it was cast in copper and bronze. The lettering will be 23K gold for extra pop. We used Modern Masters acrylic metallic paint for the copper effect. This metallic paint is brilliant and, in our experience, holds up well outside. Best of all we can apply it, by hand, with a brush. A little paint goes a long, long way. We whipped on two quick coats of gold, purposely going well onto where the copper would go next. When we applied the copper we only needed to cut in once making the job quick. The copper covers extremely well but we gave it a second coat of copper to be sure. The piece was extremely bright at this point but we will tone it down with glazes.

base coats.jpg

The first glaze we applied was a rich caramel color. The glaze is put on thick in small sections and then wiped off with a small soft towel. We have to work quick to keep a wet edge between areas. After the first light coloured glaze the textures start to pop.

first coat glaze.jpg

Once the first glaze is dry it is time for a second glaze. The second glaze was a dark chocolate with a hint of metallic purple to deepen the shadows. We need to work from top to bottom, jumping quickly from back to front and side to side to avoid dry lines between segments.

glazes done.jpg

The sign will dry in the warm studio overnight, waiting for tomorrow's finishing touch. We’ll be adding the 23K gold to the lettering. In the next instalment, we’lll take some pictures of the gilding process and show just how easy this amazing technique is.

Part 5 (A)

Dusty's Flying Service - Part 3

Part 2

Our CNC router finished off first two layers of Precision Board HDU quickly because we had used a large diameter bit to route them. We glued these up over a simple welded steel frame. By the time the second set of pieces came off the CNC router, the previous pieces were dry enough to add the new ones to the assembly.

compass glued.jpg

The next morning everything was good and dry. The clamps came off and the fun began! First we gave the entire piece the once over with our air powered die grinder. We trimmed up the glue joints, textured the edges and aded some extra character here and there making the sign look well used.

compass complete.jpg

Next we sawed the old stand off the model plane and drilled a new hole in the bottom for a 1/2" steel rod. By lining it up with one of the balloon tires the rod was well disguised.

plane assembled 2.jpg
Part 4