Dusty's Flying Service - Part 2

Part 1

When building a file in EnRoute, the first step is to imagine what you want to build... then work backwards from that point. Basically, you want to deconstruct the project, breaking it down into manageable pieces, keeping in mind the material thickness you am working with as well as the size and length of your router bits.

In this particular case we designed the compass star so we could route it with a 3/8" ball nose bit. This kept the run time pretty short.

compass points 2.jpg

For the sign’s lettering we required a smaller bit size. We designed the ring separately and tool-pathed this piece with a 1/8" ball nose bit. Both pieces were routed from 30 lbs. Precision Board HDU and were run at 300 inches per minute.

compass points 3.jpg

As soon as the compass star was off the CNC router we glued the two halves back to back on a metal frame. We used a die grinder to cut some grooves in the back to accommodate the 1/2" steel bars which give the sign some strength. The next day we glued on the rings and lettering.

compass glued.jpg
Part 3

Dusty's Flying Service - Part 1

Year ago we created this little plane on our CNC router. This series will show how we created a sign using this plane as the focal point. The sign will be for a fictitious crop dusting business called “DUSTY'S FLYING SERVICE”.

2 david.jpg

First we created the vector file for the sign. It would feature a compass star. The plane will fly through the middle of course!

compass.jpg
Part 2

Fish Fossil

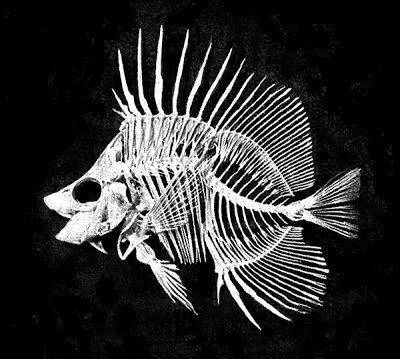
Not long after we purchased our first CNC router Dan was browsing through his old collection of National Geographic magazines looking for inspiration. He came across a picture of a fish skeleton which had been fossilized. The picture inspired an idea.

He scanned the picture into his computer, opened it in Photoshop and set about making the image suitable for use as a texture bitmap. He made it a black and white image, then adjusted the tonal balance, cleaned it up a bit and added a few missing details.

fish skeleton.jpg

He then created a second black and white texture bitmap image in Photoshop using a large speckled brush. He called it ”Spilled Coke”.

spilt coke.jpg

Next, Dan created the vector files for the panel shape and lettering which would form the border. All of this was imported into EnRoute. He created the reliefs forming the medallion shape and then he layered the texture bitmaps onto the surface one at a time. It only took a couple clicks of the mouse to make the magic happen. Finally, he tool-pathed the file and sent it out to the CNC router.

fossil.jpg

In less than an hour, the panel was routed from a piece of 30 lbs. Precision Board High Density Urethane (HDU). He whipped on a coat of acrylic paint and put it under a large fan to dry while he mixed up some glaze. The panel had dried sufficiently by the time he was done mixing and he slopped on a quick coat of glaze and quickly wiped it off with a shop towel.


The “Spilled Coke” texture bitmap is available as part of our Texture Magic: Classic Collection of texture bitmaps.