Hidden Hay'ven

The Hidden Hay’ven sign is about as simple a sign as we have ever done. The sign was to be presented to a clients retiring colleague and the deadline was a mere four days.

mac's hidden hayven.jpg

Dan whipped up a quick design which the customer approved on the spot. He paid the deposit and we started work immediately. Creating the file in EnRoute only took a few minutes and Dan sent it off to the CNC router.

hay sign.jpg

The sign was nominally single sided (with text only on one side), however, the back side featured the same woodgrain and texture as the front. The two center layers of 1" thick Precision Board HDU were simple cutouts.

sign pieces.jpg

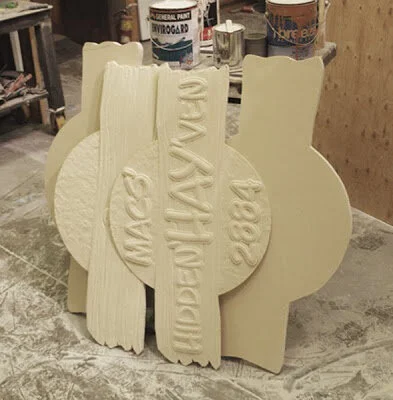
When the CNC router was done Dan glued up the pieces, complete with some structural steel inside. The steel gives the sign all the strength it will ever need.

Next, Dan finished off the edges of the sign — adding some woodgrain texture with a die grinder.

adding wood grain.jpg

Then the sign received a quick coat of primer and two coats of base colour. We kept the shop fan on the work to speed up drying times as the deadline was quickly approaching... Once the base coats were dry Dan mixed up some light acrylic glaze. This was brushed on in sections...

light stain.jpg

...then wiped off carefully. Once this was dry a darker glaze was applied.

wiping off light stain.jpg

Then Dan painted the round sun graphic in the same manner, working from dark to light. Last up was the lettering — applied with a small brush. He finished with an extra day to spare to allow the paint a chance to harden up a little.

finished sign.jpg

Vedder Mountain Grille - Part 3

Part 2

When we designed the sign and while we were building the routing file in EnRoute we were thinking about how we would paint it. As you will see,by planning the way we route the sign with painting in mind we can painting it faster and easier. Before painting the sign needs a good coat of primer.

sign primed.jpg

Next we painted on the base coat for the oval. It was a medium blue. We purposely painted the surfaces we wanted and onto the adjacent areas. Painting this way makes it easier to cut in the next colour in later. It also means we only have to cut one colour - not two.

blue base.jpg

After this we laid on two thin layers of a dark blue glaze and dabbed them with a towel to remove the brush marks. The areas around the letters were left a little darker. We applied the glaze in two coats (with time to dry in between) to make things a little more even.

graphic w glaze 2.jpg

Then it was time to paint the 3D graphic. As always base coats were first, then a blend coat, followed by the usual glaze to tone things down a little. After this, it was time to paint the scroll. The raised edges we has created with the MultiCam made things easier to paint quickly because cutting is either into a corner or over an edge.

cutting letters 2.jpg
first coated.jpg

Once the sign has its second and third coats of paint and a little gold leaf on the “Vedder Mountain” lettering, it is ready to install.

vedder mtn complete 2.jpg

Vedder Mountain Grille - Part 2

Part 1

After gluing up the sign we need to clean up the glue lines. We use a die grinder to remove the excess glue. While we are at it we add a little texture to the edges of the sign. Next we shape on the scroll ends and then spend some time carving the mountain. The die grinder whips through the Precision Board HDU pretty quickly so a light tough is necessary.

half done carving.jpg

Next it is time to work on the lower mountain, foreground trees and rows of plants using an epoxy sculpting medium.

ready for paint.jpg
Part 3